Elavon Bridge Service
The Elavon Bridge Service allows the user to process payments using a PIN pad device.
Contents
Download and install Elavon Bridge Service
Download the Elavon Bridge Service from Setup → Property Hub Configuration → Interface Settings → Payment Interface – Software Setup. Click the drop-down caret in the Software Setup section to view the latest version of Elavon Bridge available for download.
-
Click Download.
-
Navigate to the Downloads folder in your File Explorer and open the ElavonBridgeV#.#.msi file. The SynXis Elavon Bridge Setup Wizard displays. If you receive a Windows protected your PC error message, follow the steps below:
-
Right-click on the download file.
-
Select Properties.
-
In the ElavonBridgev#.# Properties pop-up, click the General tab.
-
Click the Unblock checkbox to allow the computer to run the program.
-
Click Apply.
-

-
Click Next.
-
Keep the default destination folder for the bridge, or click the Change button to select a different path.
-
Click Next.
-
Click Install. A status bar displays as the Elavon Bridge installs to your computer.
-
When the status bar disappears, click Finish to launch the SynXis Elavon Bridge Service.
SynXis Elavon Bridge Controller
Once the Elavon Bridge Service setup is complete, the SynXis Elavon Bridge Controller displays.
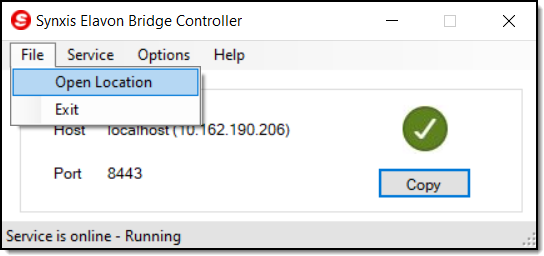
File tab
The File tab displays the following options:
-
Open Location – Displays the installation directory for the Elavon Bridge Service in your File Explorer.
-
Exit – Closes the Elavon Bridge Controller.
Installing server certificate
Pre-generated certificates are available for the Elavon Bridge Service and are installed on the local machine by default. Remote workstations need to install the service certificate to allow a secure connection to the Elavon Bridge Service. To install the certificate, navigate to the SynXis Elavon Bridge Controller:
-
Click the File tab.
-
Select Open Location from the drop-down menu. The installation directory for the Elavon Bridge opens in the user’s File Explorer.
-
Navigate to the Certificates folder in the directory.
-
Copy the local-ebs-root.pem file.
-
Share the file to the workstation that you wish to install the certificate on. Copy and paste the file in the workstation to connect to.
-
From the desired workstation, simultaneously click the Windows and R keys.
-
Enter certmgr.msc in the Open field.
-
Click OK. The Certificate Manager window displays.
-
Click Actions.
-
Select All Tasks.
-
Select Import.
-
In the Certificate Import Wizard window, click Next.
-
Click Browse to search for the location in the File Explorer where the certificate downloaded.
Note: Change the file type to All files when searching for the certificate.
-
Open the local-ebs-root.pem file.
-
Click Next.
-
Select Trusted Root Certificate Authorities from the Certificate store field.
-
Click Next.
-
Verify the certificate information presented in the Certificate Import Wizard and click Finish.
-
Click Yes at the security warning pop-up. The Elavon Bridge Service is now installed on the workstation.
Service tab
The Service tab displays the following options:
-
Stop – Stops running the Elavon Bridge Service.
-
Start/Restart – Restarts the service. A green checkmark displays to show the service is online and running.

-
View Logs – View the application log to monitor the connectivity between the Elavon Bridge Service and payment devices.
-
Renew Certificates – Refreshes the server certificate.
Renewing server certificates
If you encounter a certificate error message, you need to renew the server certificate in the Elavon Bridge Controller.
-
Click the Service tab.
-
Select Renew Certificate.

-
Click the Service tab again.
-
Select Start/Restart.
Options tab
The Options tab displays the following options:
-
Clients – Opens the Edit Clients window. You can add new client addresses or remove previously registered client addresses from this screen.
-
Port – Displays the applications running on the selected port.
Registering client addresses
By default, the Elavon Bridge Service only accepts local connections. To enable access for a remote workstation, the user needs to register the address in the Elavon Bridge Controller.
Note: The remote workstation is required to have a fixed IP address in the network that is used to connect to Elavon Bridge Service.
To register a new client address, navigate to the SynXis Elavon Bridge Controller:
-
Click the Options tab.
-
Select Clients from the drop-down menu. The Edit Clients pop-up displays.

-
Enter the workstation’s address in the Enter address field.
-
Click the Add button.
-
Click Save.
-
Navigate to the Service tab.
-
Select Start/Restart from the drop-down menu. The workstation is now registered and able to access the Elavon Bridge Service.
Help tab
The Help tab displays information about the Elavon Bridge, including its connectivity purpose and most recent version number.
Change, repair, or remove the Elavon Bridge Service
Change Elavon Bridge Service settings
To change the Elavon Bridge settings:
-
Navigate to the application’s location on your PC.
-
Double-click the application to open the SynXis Elavon Bridge Setup Wizard.
-
Click Next.
-
Click the Change button.
-
Select the installation settings to change.
-
Click the Change button to save the settings.
Repair in Elavon Bridge Service Setup Wizard
To repair the Elavon Bridge in the SynXis Elavon Bridge Setup Wizard:
-
Navigate to the application’s location on your PC.
-
Double-click the application to open the SynXis Elavon Bridge Setup Wizard.
-
Click Next.
-
Click the Repair button.
-
Click the next Repair button to start repairing the installation.
Repair Elavon Bridge Service on PC
To repair the Elavon Bridge on your PC:
-
Open Control Panel > Programs > Programs and Features on your PC.
-
Locate SynXis Elavon Bridge.
-
Select Repair.
Note: The Repair option will not work in case of a faulty installation package. If the Repair option does not fix the issues you are having, uninstall the current version and download the latest one from Setup → Property Hub Configuration → Interface Settings → Payment Interface – Software Setup.
Remove Elavon Bridge Service
To uninstall and remove the Elavon Bridge:
-
Navigate to the application’s location on your PC.
-
Double-click the application to open the SynXis Elavon Bridge Setup Wizard.
-
Click Next.
-
Click the Remove button.
-
Delete the files from the installation directory, and remove the registry created from the previous installation.
Note: When a new version of the Elavon Bridge application becomes available, you can redownload the app from Setup → Property Hub Configuration → Interface Settings → Payment Interface – Software Setup.
Troubleshooting error messages
If you see one of the below error messages when using the Elavon Bridge service, follow the steps for troubleshooting.
Connection time-out when connecting to Elavon Bridge Service
If your bridge’s status code displays unreachable or you receive a timeout error, navigate to Setup → Property Hub Configuration → Interface Settings → Payment Interface .
-
Click Refresh.
-
Connection time-out causes display:
-
Elavon Bridge is not running.
-
Open the Elavon Bridge Controller.
-
Click Service.
-
Select Start/Restart. If the Elavon Bridge Service is still not running, verify with your system administrator that the device’s connection is not blocked by the firewall.
-
-
Elavon Bridge is not installed on the workstation.
-
Open the Elavon Bridge Controller.
-
Click Options. The Edit Clients window displays.
-
Verify or edit the hostnames and IP addresses that are registered.
-
Click Save.
-
Click Service.
-
Click Start/Restart.
-
-
Elavon Bridge is using a different port.
-
Open the Elavon Bridge Controller.
-
Click Options.
-
Select Port.
-
Verify that no other applications are running on the selected port.
-
Click Save.
-
Click Service.
-
Click Start/Restart.
-
-
PIN pad connection timeout
If the Elavon Bridge Service cannot connect to the PIN pad device, the card transaction fails and displays a PinPad Connect Timeout error message.
To fix this error:
-
Verify that the PIN pad device is properly connected.
-
Verify device connection details in the Payment Interface Configuration page. Click Refresh.
-
Verify with your system administrator that the device’s connection is not blocked by the firewall.
Credit card decline
Retry, or ask the customer for another payment method.
PinPad read timeout
If the Elavon Bridge Service successfully connects to the PIN pad device but is unable to communicate, the card transaction fails. A PinPad Read Timeout error message displays. To fix this error:
-
Ensure that the device is properly connected.
-
Verify device configuration.
-
Retry running the transaction.
Blocked connection due to invalid certificate
If you receive an error message that the bridge connection is blocked due to an invalid certificate, you must set up the certificate manually in your browser. Below are the recommended browsers:
Firefox
-
Open the Firefox browser.
-
Type about:config in the Address bar.
-
Click the Accept the Risk and Continue button.
-
In the Search Preference Name field, type security.enterprise_roots.enabled.
-
Set the value to equal true.
-
Close and reopen the Firefox browser.
Internet Explorer
-
Open the Internet Explorer browser.
-
Select Tools from the menu bar, and navigate to Internet Options.
-
In the Content tab, select the Certificates button.
-
Click Trusted Root Certification Authorities tab.
-
Import the Root CA Certificate generated during installation.
Chrome
-
Open the Chrome browser.
-
Navigate to the Settings menu.
-
From the side menu, select Privacy and Security.
-
Click Security.
-
Click Manage Certificates.
-
Click Trusted Root Certification Authorities tab.
-
Import the Root CA Certificate generated during installation.
Note: You can also renew the certificate using the SynXis Elavon Bridge Service Controller. Navigate to the Service drop-down and select Renew Certificate.